Bathroom Lighting Ideas: The Layered System That Actually Works
Quick Answer
Bathroom lighting should be layered: (1) task lighting — wall sconces flanking the mirror at 170cm height, not above it, for shadow-free face lighting; (2) ambient lighting — warm dimmable recessed or ceiling fixture at 2700K, not 4000K+; (3) shower zone — IP65-rated recessed light inside the shower, positioned ahead of the standing position; (4) a dimmer on all circuits. The biggest mistake is a single overhead recessed grid — it produces even, directionless, commercial-feeling light and creates unflattering shadows downward for grooming.
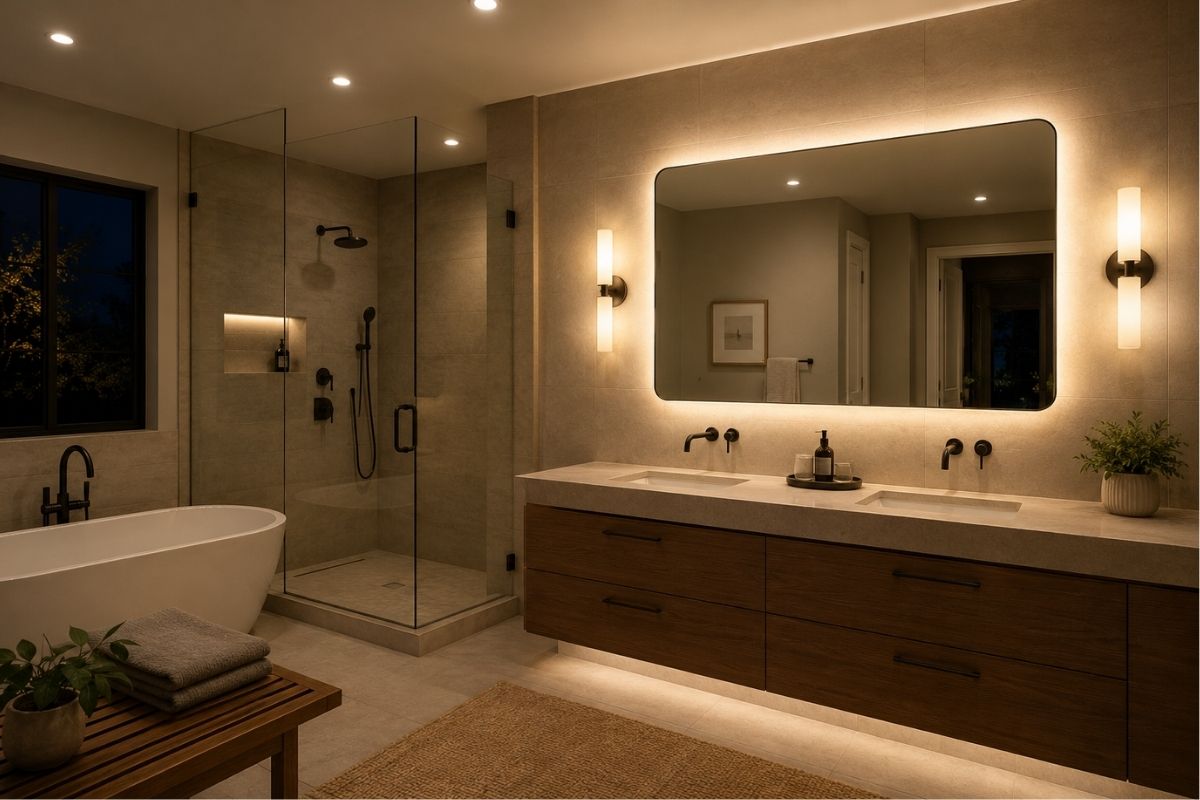
Bathroom lighting is where most residential design fails most consistently. The standard approach — a grid of recessed downlights in the ceiling, all on one switch — produces a functional amount of light while failing at every other criterion: it creates harsh shadows for grooming, cannot be dimmed for evening use, provides no warmth or atmosphere, and typically uses a colour temperature (4000K) that makes skin look grey.
The fix requires understanding what each zone of the bathroom needs and providing the right light in the right place.
The Mirror Lighting Mistake
The most common single bathroom lighting error is a recessed downlight or a surface fixture mounted directly above the mirror. From this position, the light shines downward — creating shadows under the chin, the nose, the eyebrows, and the cheekbones. It’s the optical equivalent of holding a torch under your face.
This light position is useless for makeup application, shaving, skincare, and any grooming task requiring even face illumination.
The correct position
Wall sconces (or a horizontal LED strip) flanking the mirror at face height — approximately 170cm from the floor. From this position, light comes from both sides simultaneously, filling in shadows on both sides of the face. The result is the even, shadow-free illumination that professional makeup artists use.
This is how mirrors in backstage dressing rooms, hotel vanities, and professional bathrooms are lit — not from above.
Fixture choice for mirror flanking
- Wall sconces: two identical units, one on each side of the mirror, 170cm centred. Minimum 60–80cm apart (the width of the face zone plus margin)
- Vertical LED strip: a 50–60cm long vertical strip on each side of the mirror, providing an even light column rather than a point source
- Hollywood mirror with built-in surround lighting: a complete solution for principal bathrooms, with LED surround built into the mirror frame
Task Lighting for Grooming
Sconce sizing
A sconce with a diffused shade (frosted glass, linen, or opal acrylic) produces softer light than one with an open shade or a bare bulb. For grooming task lighting, a diffused shade at face height provides light without harsh directionality.
Wattage: 5–8W LED equivalent per side. Two 5W sconces flanking the mirror provide more useful light than one 10W downlight above it.
Integrated mirror lighting
LED-illuminated mirrors (with strip lighting built into the mirror edge or a backlit LED panel) are a practical single-unit alternative to separate sconces. The front-lit versions (LED strip in the mirror frame, facing outward) provide reasonable face lighting. The backlit versions (LED glow from behind the mirror) provide atmospheric backlight without task lighting — better as a supplemental light than a primary grooming light.
Vanity sconce placement for double basin
On a double vanity with two basins: position one sconce above the centre between the two basins (centred lighting for both positions), or two sconces flanking the mirror on the outer edges (optimal coverage for both positions). The second option is preferable but requires a wider mirror and more wall space.
Ambient Lighting
Ceiling fixture selection
The ambient bathroom light — the general room light — should be on a separate circuit from the task lighting so each can be controlled independently. Options:
- Semi-flush ceiling fitting with diffused glass or opal shade: the most common and practical choice
- Recessed downlights (2–3): dimmable, warm white, spread to cover the room without focusing on the mirror zone
- Pendant light (in a large bathroom): statement piece, requires adequate ceiling height (minimum 2.2m clearance from pendant bottom to floor), IP44 minimum
Dimmer
A dimmer on the ambient circuit is not optional in a bathroom used in the evening. The ability to use the bathroom at very low ambient light (for a bath, for skincare, for winding down) while maintaining function is a quality-of-life element that recessed-grid bathroom lighting cannot provide.
Ceiling height
In a bathroom with a low ceiling (under 2.2m), a flush or semi-flush ceiling fitting avoids the vertical space consumption of a pendant. In a bathroom with standard (2.4m) or higher ceilings, a pendant in a warm material (ceramic, rattan, paper) adds character that recessed lights cannot.
Shower Zone Lighting
IP rating requirement
Inside the shower (Zone 1 in UK electrical regulations): IP65 minimum. This means the fitting is protected against water jets from any direction — appropriate for a direct water spray. Standard IP44 is not sufficient inside a shower enclosure.
Fixture type
A recessed IP65 downlight, flush with the shower ceiling, in the same ceiling material as the rest of the shower enclosure (if tiled to ceiling). Trim ring in the same finish as the shower hardware (brass, chrome, brushed nickel).
Positioning
Position the shower light at the end of the shower furthest from the glass panel — not directly above the standing position. From a position ahead of where you stand, the light is below the shower head and provides illumination of the body and shower controls without shining directly into the eyes during use.
Colour temperature in the shower
2700K warm white in the shower, matching the rest of the bathroom lighting. A cool white (4000K+) inside a shower creates a harsh, fluorescent-adjacent quality that makes the showering experience less pleasant. Warm light in the shower is a small detail with a noticeable daily impact.
IP Ratings Explained
The IP (Ingress Protection) rating system defines a fixture’s resistance to solid particles (first digit) and water (second digit). In bathrooms, only the water resistance is relevant.
Zone 1 (inside bath or shower, up to 225cm above the flood level)
IP65: protected against water jets from any direction. Required for any fitting installed inside the shower enclosure or directly above the bath.
Zone 2 (within 60cm horizontal distance from the bath or shower edge)
IP44: protected against water splashes from any direction. Required for fittings within 60cm of the shower or bath zone but outside of it.
Outside Zones 1 and 2
No IP rating technically required, but IP20 (protection against solid objects over 12mm, no water protection) is the minimum standard. For safety and durability, IP44 is recommended for all bathroom ceiling fixtures regardless of zone.
Practical implication
Most quality bathroom lighting manufacturers rate their bathroom-specific ranges at IP44 for wall fittings and ceiling fittings, and IP65 for in-shower fittings. If purchasing a general lighting range (not specifically rated for bathrooms), check the IP rating before installation.
Colour Temperature
2700K: the only correct choice for residential bathrooms
2700K is warm white — similar to incandescent light, the standard for residential rooms. At this temperature, skin tones appear natural and flattering, and the room creates a warm atmosphere.
What not to use
- 4000K (cool white / neutral white): makes the bathroom look and feel like an office or a clinic. Skin tones appear grey or washed out. Very common in budget bathroom downlights — avoid.
- 3000K (warm white / neutral): acceptable but slightly cooler than ideal. Some people prefer this for morning alertness. 2700K is still recommended for bathrooms used in the evening.
- 5000K+ (daylight): appropriate for photography studios and workshops. Not appropriate for any residential room, including bathrooms. Makes skin appear harsh and creates an extremely clinical environment.
LED bulbs and fixtures
Modern LED bathroom fixtures are available at 2700K from all major lighting manufacturers. When purchasing dimmable LED bulbs for existing sockets, look specifically for 2700K on the packaging — this is typically described as “warm white” rather than “cool white” or “daylight.”
Smart Bathroom Lighting
Smart lighting in a bathroom is most valuable for two functions: automated dimming and scheduled colour temperature adjustment. Both require minimal installation if the bathroom already has switched circuits.
Smart switches and dimmers
The simplest smart bathroom upgrade: replace a standard bathroom dimmer with a smart dimmer (Lutron Caseta, Philips Hue smart dimmer, or equivalent). These work with most existing LED bathroom fixtures without replacing the bulbs. The dimmer can be programmed by time — full brightness for the morning routine, 30% for the evening bath. No smart bulbs required; the smart control is at the switch.
Requirement: the dimmer must be rated for bathroom use (check the manufacturer’s IP rating for the switch plate). Most smart dimmers are rated for dry locations only — install in Zone 0 (outside the wet zones) or use a remotely mounted module with a standard plate.
IP-rated smart outdoor plugs for bathroom accessories
For plug-in bathroom accessories (shaver sockets, diffusers, small lamps), IP44-rated smart plugs allow timer control without rewiring. TP-Link Kasa EP40, Meross MSS630, and Eve Energy are commonly used. Useful for setting a diffuser to run 30 minutes before bath time, or automating a plug-in lamp on the vanity.
Motion-activated lighting
A motion sensor on the ambient bathroom circuit provides automatic lighting for night-time visits without a manual switch. Set brightness to 10–15% at night — enough to navigate safely, not enough to wake the occupant fully. Philips Hue Outdoor Motion Sensor (IP54) is suitable for bathroom use and integrates with most smart home platforms. Keep the night-mode circuit separate from the mirror task lighting, which should remain manually controlled.
Scheduling by use pattern
The most practical bathroom smart lighting programme:
- 6:00–8:00am: task lighting at 100%, ambient at 80% — full brightness for morning routine
- 8:00pm–10:00pm: ambient at 50%, task lighting off unless triggered manually — evening mode
- 10:00pm–6:00am: motion-activated ambient at 10% only — night navigation mode
This eliminates the need to manage individual switches in a groggy state and ensures the bathroom never defaults to the harsh overhead-only mode in the evening.
Frequently Asked Questions
- Where should bathroom lights be placed?
- Task lighting (for grooming) should flank the mirror at face height — 170cm from the floor, on either side of the mirror. This provides even lighting on both sides of the face without shadows. Ambient lighting goes overhead as a ceiling fixture or recessed light, on a separate circuit with a dimmer. Inside the shower, one IP65-rated recessed fixture positioned at the far end.
- What IP rating do bathroom lights need?
- IP rating requirements depend on the zone. Zone 1 (inside shower/bath, up to 225cm above the water): IP65 minimum. Zone 2 (within 60cm horizontally of the bath or shower): IP44 minimum. Outside these zones (over the basin, on the ceiling away from the wet zone): IP20 is acceptable but IP44 is safer practice for ceiling fixtures.
- What colour temperature is best for a bathroom?
- 2700K warm white for the primary bathroom lighting — this is the most flattering for skin tones and creates a warm, comfortable atmosphere. Avoid 4000K+ (cool white) and 5000K+ (daylight) in bathroom environments — they read as clinical and produce unflattering, harsh lighting for grooming.
- How many lights should a bathroom have?
- At minimum two circuits: one for task lighting (mirror zone) and one for ambient lighting (main ceiling). Ideally three: task lighting, ambient, and shower zone. A dimmer on the ambient circuit allows the bathroom to function at low light levels in the evening. A single ceiling downlight grid without a dimmer is both the most common and the least functional bathroom lighting scheme.