Master Bathroom Ideas: Layout, Features, and the Design Decisions That Make It Feel Like a Retreat
Quick Answer
A master bathroom should include: a double vanity (1200–1500mm wide), a walk-in shower (minimum 900×1200mm, ideally 1200×1200mm) as the primary washing zone, a freestanding bath only if the room exceeds 8m², a heated towel rail on a dedicated circuit (not just the central heating), and wall-mounted lighting flanking the mirror at face height (not overhead downlights above the basin) for functional task lighting. The floor plan must maintain 700mm clearance on each open side of the bath and 600mm in front of the WC.
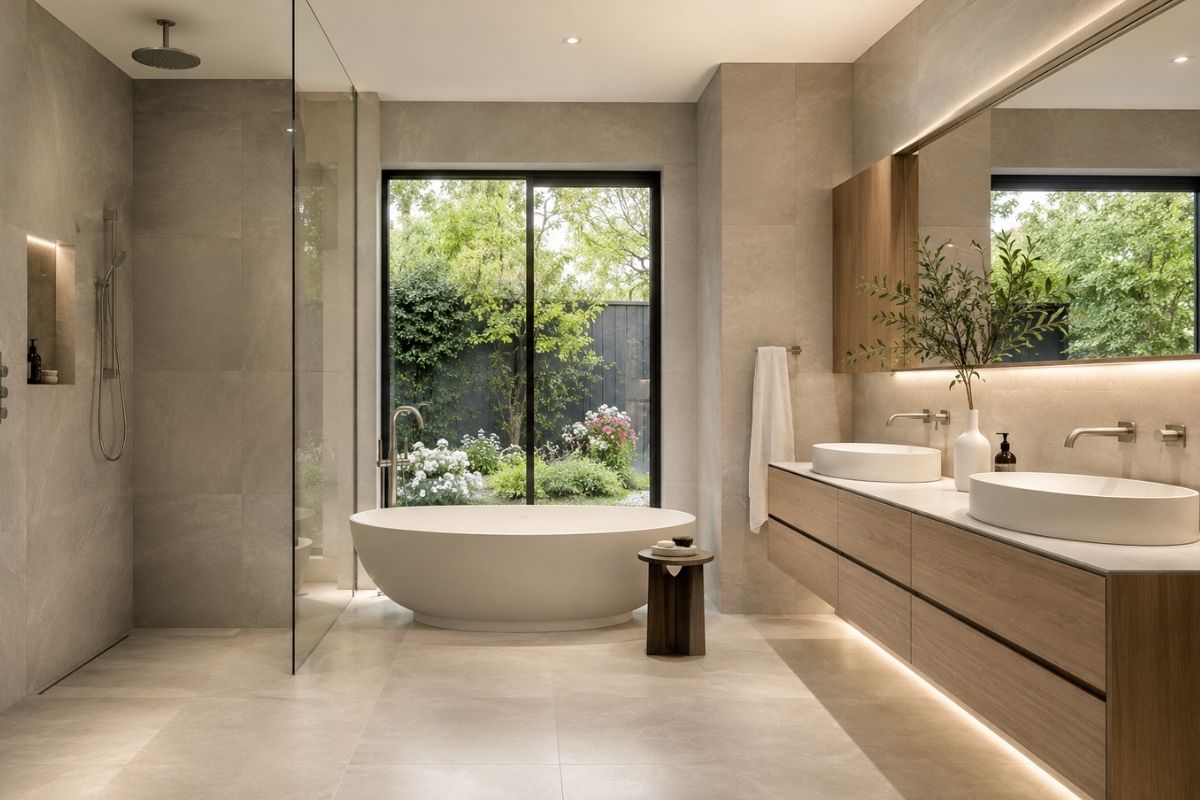
A master bathroom functions differently from a family bathroom or an en suite. It’s used by two people in a coordinated morning routine, needs storage for both people’s products, and is the first room entered at the start of each day. Getting it wrong — insufficient storage, single vanity for two people, or a shower that’s too small for daily use — creates daily friction in the most used room in the house.
Layout Planning
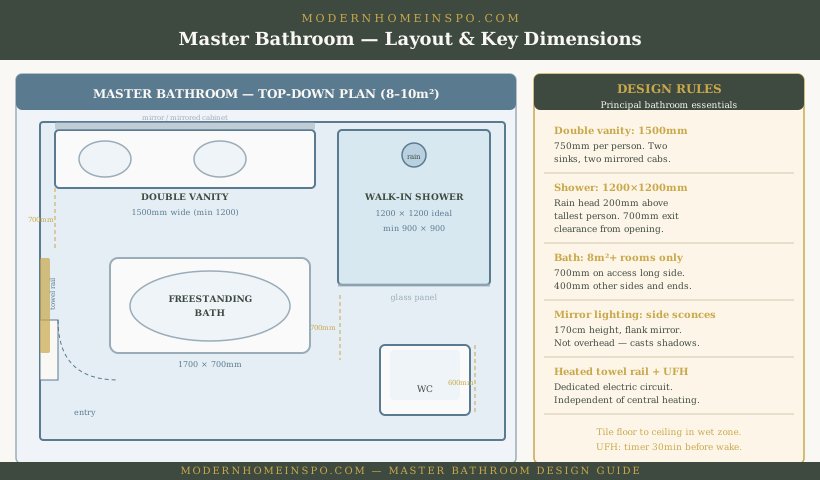
A successful master bathroom layout places the fixtures in a logical sequence based on daily use: WC in the most private position (furthest from the door, often behind a half-wall or pocket door), vanity opposite or adjacent to the entrance (first fixture used in the morning), shower as the primary wet zone, and bath as a secondary feature if included.
Clearance requirements
- WC: 600mm in front of the pan; 400mm either side; 150mm from any wall to the centre of the pan
- Basin/vanity: 700mm in front; 400mm to adjacent wall from basin edge
- Bath: 700mm along at least one long side for entry; 400mm at the foot
- Walk-in shower: 700mm exit clearance from the shower opening
Flow from door to vanity
The vanity is the fixture with the most daily use — for teeth brushing, skincare, and morning preparation. Positioning it on the wall visible from the entrance (or immediately adjacent) means the most-used element is the first reached. This is distinct from how family bathrooms work, where the WC is often most urgently needed and positioned for fastest access.
Separation of WC from grooming area
In principal bathrooms, separation between the WC and the vanity/shower zone is worth achieving. A half-wall, a pocket door to a WC compartment, or simply placing the WC around a corner from the vanity creates the privacy that makes two-person simultaneous use of the bathroom practical and comfortable.
The Double Vanity
The double vanity is the most impactful functional improvement over a single-vanity family bathroom. Two people using the bathroom simultaneously no longer requires coordination.
Vanity width
Minimum 1200mm for a two-person double vanity. 1500mm is the most comfortable — allowing 750mm per person and room for products on the counter between basins. At 1200mm (600mm per person), there’s minimal counter space between or outside the basins; this can be addressed by adding storage below and the mirrored cabinet above.
Two sinks vs one large sink
Two separate circular or rectangular undermount sinks are more practical than one large double sink. With two sinks, each person has a defined basin; with a single large sink, coordination is still required at peak times.
Below-vanity storage
Allocate storage specifically: one side for each person. Drawers are more efficient than cupboards — a deep-drawer vanity unit (20cm, 15cm, 10cm drawer from bottom up) stores significantly more than the same footprint with cupboard shelves.
Mirror configuration
Options for a double vanity:
- One long mirror spanning the full width (cleanest look, less storage)
- Two individual mirrored cabinets above each basin (most storage, most practical)
- One large mirrored cabinet centred on the double vanity (middle ground)
Mirrored cabinets add internal storage for each person’s daily products — reducing counter clutter significantly.
Shower Configuration
The walk-in shower in a master bathroom is the primary daily fixture — it deserves more consideration than the bath in most households.
Minimum size for luxury feel
900×900mm is the practical minimum for daily showering. 1000×1000mm feels significantly more comfortable. 1200×1200mm is where the walk-in shower stops feeling like a functional box and starts feeling like a room element. For a principal bathroom designed as a retreat, 1200×1200mm is the recommendation.
Wet room vs enclosed shower
A wet room (no shower tray, floor-to-drain tile, glass panel only) in a principal bathroom works best when the shower zone is architecturally separated from the rest of the room — by level change, by partial wall, or by floor plan configuration. In an open-plan bathroom, a fully wet room floor can make the entire room feel like it needs to dry after each shower.
An enclosed walk-in shower (shower tray or flush-tiled floor, glass panel on one or two sides, no door) is the most practical configuration for most principal bathrooms — it contains the water, dries quickly, and looks and feels generous.
Shower head configuration
Fixed overhead rain head (200–300mm diameter) at the far end of the shower so entry doesn’t require ducking beneath it — minimum 200mm above the tallest occupant’s head. Supplemented by a flexible handshower on a slider rail for practical hair washing and body-directed flow.
For steam shower specifications (sealed enclosure requirements, domed ceiling, generator sizing), shower bench design, and the sensory rain head positioning detail, see Spa Bathroom Ideas.
Bath or No Bath?
The honest calculation
Most households with both a bath and a shower use the shower daily and the bath 1–3 times per month. The bath takes 1700mm of floor length and 700mm of adjacent clearance for entry — a footprint of approximately 1.2–1.4m². In a 6m² bathroom, that’s 20–25% of the total floor area.
If the bathroom is large enough (8m²+) and the bath will genuinely be used, include it. If the room is tight or the bath is aspirational rather than practical, invest that square meterage in a larger shower and better storage.
Freestanding bath positioning
A freestanding bath needs clearance on all sides: 700mm on the access long side, 400mm on the other long side, 400mm at both ends. This positions it as a room centrepiece — visible from the door, requiring no other furniture in its immediate zone.
The most resolved positioning: centred on a wall opposite the door (serves as the room’s focal point when entering) or positioned under a window with a view. Avoid positioning the bath in a corner — it makes the access clearance impossible without compromising one side.
Built-in bath with deck
A built-in bath with a tiled deck (single or double-ended) provides a surface for products and candles, integrates into the room more architecturally than a freestanding piece, and is typically less expensive. Best in rooms where a freestanding bath would feel isolated or where the room architecture (an alcove, a niche) suits a fitted form.
Materials and Finishes
Floor material
Large-format stone or porcelain tile (600×600mm or 600×1200mm) in warm tones — limestone, warm travertine effect, or warm grey stone. Underfloor heating is strongly recommended in a principal bathroom: cold floors on bare feet undermine the retreat quality significantly.
Wall material
Full-height tile in the wet zone (shower). On dry walls: either the same tile material (most luxurious, most unified) or a high-quality bathroom paint in a warm-toned palette.
Stone effect large-format porcelain tiles are the most practical principal bathroom material: they achieve the appearance of natural stone at lower maintenance cost, are available in 120×60cm and larger formats, and suit a wide palette range.
Hardware
Choose one finish and use it across all fixtures: basin tap, bath tap, shower valve, towel rail, toilet roll holder, robe hooks. Brushed brass is the most popular current choice for principal bathrooms — it reads as warm and refined without being ornate. Brushed nickel for a cooler, more contemporary feel.
Lighting and Heating
Mirror lighting
Wall sconces flanking the mirror at face height (170cm) — not an overhead downlight above the mirror. Overhead mirror lighting casts downward shadows that make grooming difficult. For the complete lighting specification including IP zone rules, ambient circuits, and shower zone placement, see Bathroom Lighting Ideas.
Heated towel rail
On a dedicated electric circuit (not only connected to the central heating). This allows the towel rail to function independently of the central heating schedule — essential for warming a towel on a summer morning when the central heating is off. Ladder-style rail, 600–800mm wide and 1600–1800mm tall for a principal bathroom, in the same hardware finish as the room.
Underfloor heating
The most significant quality-of-life investment in a principal bathroom. Electric UFH (a mat under the floor tiles) is the most practical installation for an existing room — far less invasive than wet UFH. Programme the timer for 30 minutes before wake-up and 30 minutes before the evening bath.
Frequently Asked Questions
- Does a master bathroom need a bath?
- No — for most households, a well-designed walk-in shower is used far more frequently than a bath. A freestanding bath requires 700mm clearance on at least one long side and at the foot — in rooms under 8m², this leaves insufficient space for other fixtures. In rooms 8m²+, a freestanding bath as a centrepiece is a strong design choice. In smaller master bathrooms, a large walk-in shower is a better investment than a bath that rarely gets used.
- What size should a master bathroom vanity be?
- A double vanity for two people: 1200mm wide minimum, 1500mm preferred. Each person needs approximately 600mm of basin width for comfortable daily use. A single large basin at 600mm serves one person well; two people sharing a single basin creates daily friction that a double vanity eliminates entirely.
- What is the minimum size for a master bathroom?
- A master bathroom with double vanity, walk-in shower, and WC requires approximately 4–5m². Adding a freestanding bath pushes the requirement to 7–8m². For a comfortable, uncompromised principal bathroom, 8–10m² allows a generous walk-in shower, double vanity, bath, and proper clearances without feeling cramped.
- Should master bathroom tiles go floor to ceiling?
- In the wet zone (shower), floor-to-ceiling tile is both practical and visually cleaner than a tiled lower half and painted upper half. On bathroom walls outside the wet zone, floor-to-ceiling tile in the same material creates a luxurious, hotel-like quality in principal bathrooms and makes the room feel larger.